Google test is Google’s C++ test framework for creating unit tests, and is also known as GTest. It is based on xUnit architecture, where xUnit architecture is a set of frameworks for creating and executing unit tests.
The Gtest framework helps in creating and executing C++ unit tests. Since it is platform-independent, it is compatible with multiple operating systems like Windows, Linux and multiple compilers. So it can be used by anyone who wants to unit test their software application.
Advantages of GTest Framework
- Better Tests: Google C++ Testing Framework provides libraries to write better C++ test cases.
- Automatic discovery of test cases: Google C++ Testing Framework provides automatic discovery of test cases where we do not need to add each test manually.
- Isolates Tests: To isolate the tests Google C++ framework runs the tests on different objects. Running a test in isolation helps in the easy debugging of test failure (if any).
- Organized Tests: Google C++ Testing framework writes test cases by grouping various related tests that can share common data.
- Failure Information: When a test fails, Google C++ Testing Framework provides numerous assertions/checks which give a detailed report on the failure.
- Platform Neutral: Gtest can be used to write test cases on any platform. For example Google test is supported on any OS (Windows and Linux) and any compiler can compile the test cases. Running Gtest on any platform makes it an ideal option for users who want to create a new project or are working on an existing project.
GTest basic Concepts
Assertions: While using the Google C++ Testing Framework, assertions are first written. Assertions are statements that check for a condition to be true. Assertions are macros that test the behavior of the tests. The result of an assertion can be a success, nonfatal failure, or fatal failure.
A failed assertion prints the name of the test, the line where it failed and a message which can be a default message or a customized one. If the result of the assertion is a success only then does the test continue else, it aborts.
Gtest prints the error/failure message along with the line number on the failure of any test.
Simple Test: A simple test is created by using the TEST() macro. These tests are normal C++ functions that don’t return any value. The result of a test case is determined by the result of the assertion. If any assertions fail, the test fails completely.
Test Fixtures: Test fixtures are a group of tests that execute on common data. Multiple tests in a test suite that share common data are combined into a test fixture class. The test fixture is a class that inherits testing::Test.
Each test that belongs to the test fixture is expanded by the macro TEST_F(). For example, if you want to measure some value, the test fixture helps to provide custom values to help measure those values.
Death Tests: Google test provides a unique solution to processes that exit with improper exit code. These are called Death Assertions. These death tests verify if a process exited with an improper exit code. The macros used for death tests are ASSERT_EXIT, ASSERT_DEATH, etc.
Test Program: Group of multiple test cases forms a test program.
What is Google Mock or Gmock
While writing test cases for any software product, it becomes difficult to depend completely on real objects or other modules in project are not yet ready. In such scenarios where depending on real objects becomes difficult, mock object implementation helps. A mock object is a replica of a real object.
Mock objects are not Fake. There is a vast difference between them in Test-Driven Development (TDD) environment
- Fake objects are not identical implementations, but usually, some changes are made to make production inexpensive, which makes them unsuitable for production.
- Mocks objects are complete identical implementations of a real scenario
Gmock is a library/framework which helps to create mock classes for C++ test cases written using Google test. These mock classes remove dependencies on various real objects and help to execute the test case in isolation in fast and make them more reliable.
The Gmock was designed in such a way that it meets the principles and Object-Oriented Programming (OOPs) concepts of C++ programming.
Gmock can be used as a:
- Design tool – You can play around your interface design by creating various mock classes and catch any design deficiency at a very early stage.
- Testing tool – You can reduce external real object interference using gmock and can create fast running, error-free, reliable tests.
When to use Gmock
Gmock is used in the below scenarios:
- When your test cases become very slow due to many dependencies on resources like databases.
- When your test cases are prone to break due to unreliable resources like the internet.
- When your test cases have failure scenarios but can’t the failure can’t be traced.
- When your test cases interact with various other modules but tracing the interaction for observation purposes is a troublesome job.
Basic GTest setup
Here is a generalized way of setting up a gtest framework for unit testing your applications. There are different ways we can set up the gtest framework based on the build system you’re using.
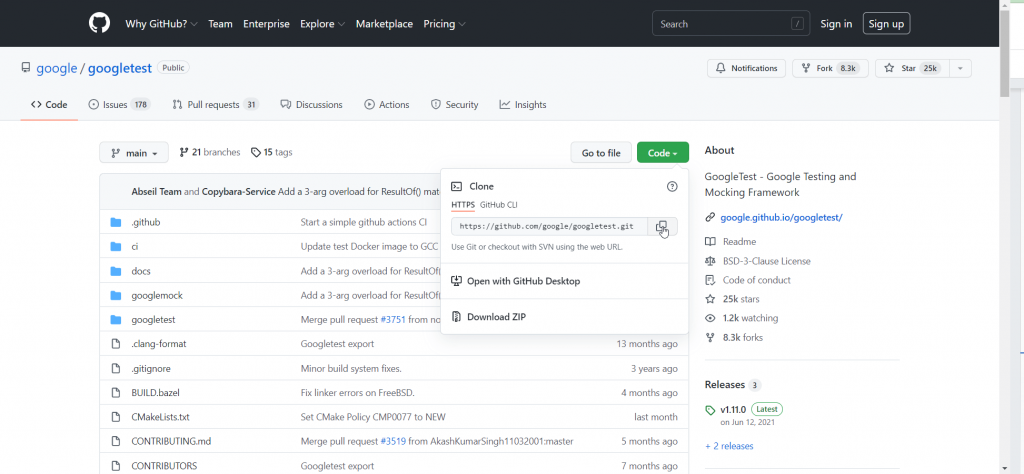
Step 1: Download Google test project files from the google test GitHub repository.
https://github.com/google/googletest
Step 2: You can either git clone or download as zip file and build gtest library.
Step 3: Open the terminal or command prompt in the location where you want to install/setup your Google test project files and run the git clone and paste the copied link.
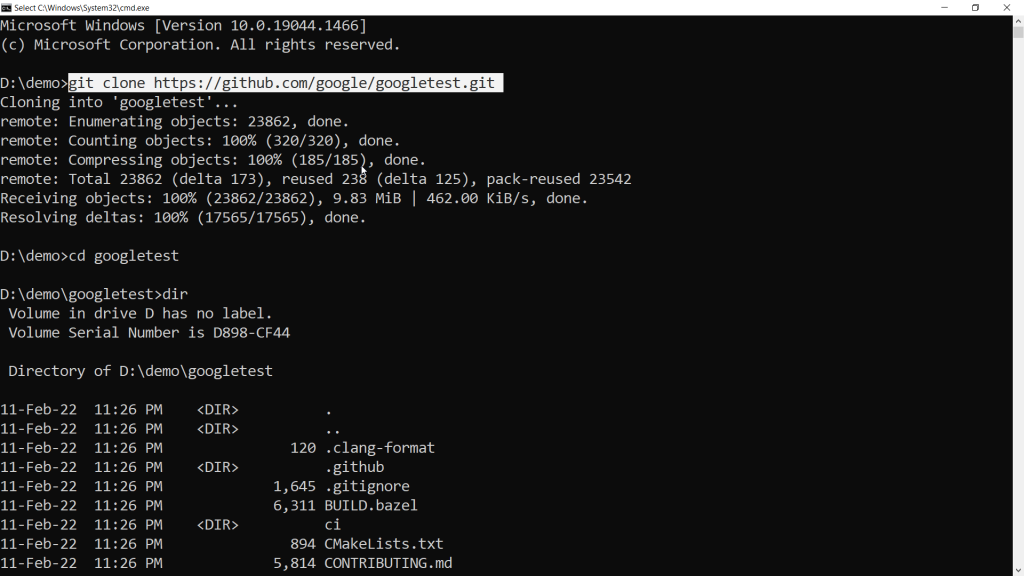
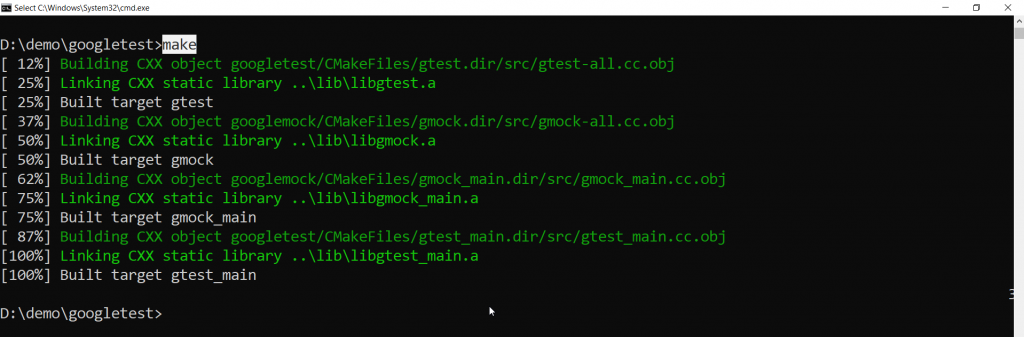
Step 4: Navigate to the cloned Googletest folder. Based on the build system you need to build gtest library. Here we will use the Cmake build system with GNU compiler to build the Gtest library.
You should have already set up the cmake build system and the MinGW compiler. Both cmake and g++ should be in your system path.
It is necessary to compile Google tests framework in same build system or compiler used in your project build system in order to generate gtest library. Then add the newly created GTest library to your project build system, to create and run unit tests
cmake -G “MinGW Makefiles” .

Check out how to integrate the GTest framework with Makefile, cmake and the Visual Studio IDE or Eclipse IDE.
Gtest example
To write and test using google test we need to compile google tests using some build system or compiler used in in your project build system. Some of the famous build systems are Cmake, Visual Studio, Mac XCode, GNU make, Borland C++ Builder.
A basic default main function of the google test project is something similar to the below code(Build system used: cmake):
int main(int argc, char **argv){
testing::InitGoogleTest(&argc, argv);
return RUN_ALL_TESTS();
}
The above code is a sample main function. The int main function calls the testing::InitGoogleTest method. This method is responsible for initializing the google test framework. This method must be called before running the tests. To run tests, RUN_ALL_TESTS() method is invoked.
NOTE: Your main function must return the value of RUN_ALL_TESTS() else you will get a compiler error. The reason behind this service is that the result of a test depends on the return value of RUN_ALL_TESTS() and not on the output of stdout or stderr.
A basic default test function of a google test project looks similar to the below code (Build system used: cmake):
#include <gtest/gtest.h>
TEST(TestName, Subtest_1){
ASSERT_TRUE(1 == 1);
}
The above code is a sample test function. This creates a test with the test name “TestName” and adds a unit test named “Subtest_1” under it. TEST is the macro defined in gtest.h. ASSERT_TRUE is also a macro defined in gtest.h. The code snippet includes gtest “gtest.h” adds all the pre-defined codes inside the gtest.h header.
A basic test fixture of a google test project looks like (Build system used: cmake)
#include <gtest/gtest.h>
TEST_F(TestFixtureName, Subtest_1){
….Test Body….
}
Multiple tests in a test suite that share common data are combined into a test fixture class. Each test that belongs to the test fixture is expanded by the macro TEST_F().
TEST_F macro is pre-defined under the gtest.h header.
Compile and run GTest tests
Step 1: To compile a google test project from the command prompt run the below command(Build system used :cmake)

Step 2: To run the test and verify the output of a google test project.

As you can see output of a test in a Google test project that has passed. In case of passing the test, Actual and Expected output is not displayed.
Here you can view which tests have passed and which have failed. To determine which code was executed and which code was not executed as a result of running unit tests, we must perform code coverage analysis. This can be accomplished using code coverage tools.
Some of the command line arguments in GTest
To add the output into XML format, run the below code on the command line:
gtest_output=”xml:reportname.xml” //where report name is the name of the report, of course, the name can be any user-defined name.
To run a test multiple times, run the below code on the command line:
–gtest_repeat=x //where x is the number of times you want to run the test.
To invoke a debugger on any failure:
–gtest_break_on_failure
To temporarily disable a test in a Google test project, use the below code
Example Code 1:In the following example code the whole TestName hierarchy will be disabled, so, all the unit tests under TestName will be blocked from running.
#include <gtest/gtest.h>
TEST(DISABLE_TestName, Subtest_1){
ASSERT_TRUE(1 == 1);
}
Example Code 2:In the following example code only one unit test, Subtest_1, will be disabled, and any other unit test written under the TestName hierarchy will run normally.
#include <gtest/gtest.h>
TEST(TestName, DISABLE_Subtest_1){
ASSERT_TRUE(1 == 1);
}
Automated unit tests generation(GTest)
1. Seamless Integration
RKTracer effortlessly integrates with your favorite Integrated Development Environment (IDE), like IAR Embedded Workbench, Eclipse, Keil μVision, Visual Studio, and more. With plug-ins designed for easy workflow integration, RKTracer fits right into your setup.
2. Quick Configuration
Just switch on RKTracer, and it takes care of the rest. It automatically detects the compiler or cross-compiler from your build system and adds the necessary runtime libraries. This makes configuration a breeze, whether you’re testing on your host system or a target device.
3. Effortless Test Generation and Execution
RKTracer makes unit testing a game-changer with automatic test case generation:
- Auto-Generate Tests: RKTracer scans your source code (e.g., simple.cpp) and creates unit test cases (e.g., simple_rk_test.cpp) using popular frameworks like Google Test or Unity. It handles all dependencies, necessary headers, etc. for you.
- Add to Your Project: The generated test files are saved locally in your project directory. Just manually add these to your build system to start using them.
- Customize Easily: For projects with static or private functions, RKTracer creates wrappers. You’ll see comments in the test files showing exactly where these wrappers are added.
- Run Your Tests: Once the test files are added to your project, run them to validate your code’s functionality with ease.
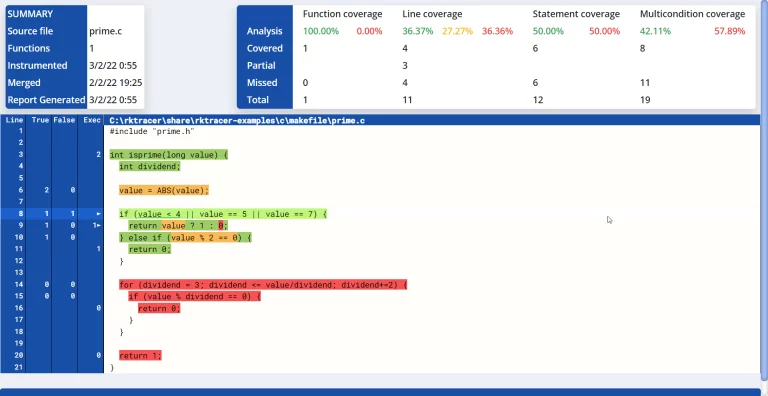
4. One-Click Code Coverage Reports
After running your tests, generate detailed code coverage reports with just one click. RKTracer delivers comprehensive coverage analysis for both host and target environments, giving you complete visibility into your application’s performance.
Disadvantages of Google Test
The only known limitation of the Google test(gtest) is its design to be thread-safe. Any system where the pthreads library is present, the implementation of google test(gtest) will be an ideal and safe solution. But any system which wants to run two threads concurrently, google test(gtest) is unsafe to use.
Conclusion
Google test is a testing framework. Irrespective of the platform you work on, if you work on C++ code then google test is the best testing solution for you. Google test can work with any build system like Visual Studio, Borland C++ Builder, GNU make, etc. Google test provides various tools to run the tests, track the progress, display the failures with customized failure messages. Since it runs tests in isolation, debugging becomes very simple and easy to work on.
All these advantages make Google test the best go-to option for any C++ developer to test their code. Any developer can use Google test for a new project or an existing project.